I decided to start this journey by visiting a normal vector. Just to be sure we are all on the same page a few words about the normal vector. In 3D space a vector which is orthogonal (perpendicular) to a plane, it is called a normal of this plane. This means that the normal vector defines the plane orientation is 3D space. There is massive number of online resources about this subject, so if you want learn more just google it. But now we just move to coding.
I will start with my base shader. It is just very simple vertex and fragment shader. You can download it from my github Base Shader or in Unity3D (I have done that for Unity3D 2017.2.1p4) hit Create/Shader/Unlit Shader. Then open this shader and (i) remove lines related to a fog and (ii) removed the shader level of detail (LOD 100) line. Of course this is a quite boring shader. It will render a white flat object only. However it is perfect starting points, and we will build from it.
First we will explore normals in an object space and present them with RGB colours. The good news is that each vertex has already an information about normal vector, so we need only access it. To do so we will make following changes in our shader code:
 - in AppData struct add: float3 normal : NORMAL;
 - in v2f struct add: float3 normal : NORMAL;
 - in vertex function add: o.normal = v.normal;
Now we can access the normal data in our fragment shader. To show normal values, we will draw planes having RGB colour according to theirs space orientation, namely planes which are oriented along x-axis in red colour, y-axis in green and z-axis in blue. To make it happen, frag function needs to change:
 - in fragment shader comment: texture sampling line of code
 - in fragment shader add: fixed4 col = fixed4(abs(i.normal.r), abs(i.normal.g), abs(i.normal.b), 1);

Figure 1. Normals in Object Space
On Fig. 1. we can see the effect of this shader on a box model. Because the values of normals are taken from the Object Space, colours of box faces will not change under box rotation. Of course we can also see how normals for this model look like in World Space. To do so we will use Unity3D predefined function:
 - in v2f struct add: float3 worldNormal : TEXCOORD1;  // field for our new normal data
 - in vertex shader add: o.worldNormal = UnityObjectToWorldNormal(v.normal); // unity helper function to compute world space normal
 - in fragment shader replace normal by worldNormal:
fixed4 col = fixed4(abs(i.worldNormal.r), abs(i.worldNormal.g), abs(i.worldNormal.b), 1);
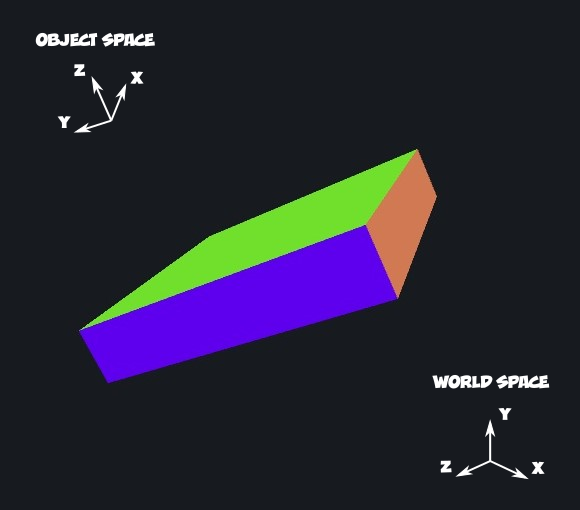
Figure 2. Normals in World Space
If your shader is attached to any object, you should see the difference immediately. If not try to rotate object, to be sure that the Object Space is not perfectly aligned with the World Space. The shader impact on my box model is presented on Fig. 2. Now the colours are related to World Space as expected. Since the object is not perfectly aligned with the World Space coordinate system the RGB channels of faces colours are mixed.
Can we make something funny with this? Of course we can :). Let’s use normal values as a mask. To make it much funnier I will use one of my B&W photo as a texture (Fig. 3). So change fragment shader as follow:
 - in fragment shader uncomment: texture sampling line fixed4 col = tex2D(_MainTex, i.uv);
 - in fragment shader calculate mask value: float mask = step(0.5, abs(i.normal.b)); // you can use worldNormal as well. 0.5 is threshold value you can put it to shader properties for easy testing
 - in fragment shader multiply colour by mask: col *= mask;
 - in fragment shader keep alpha channel equal 1: col.a = 1.0;

Figure 3. Object with Texture
Fig. 3. shows the model of box when the effect is not applied. And video bellow shows the result of the shader for both the World and Object Space normal. You can see that faces of box which are not aligned along z-axis is drawn black instead of taking values from texture. And that is all for now. Thanks for reading.